Hi to all visitors of our site! Today I'd like to talk about the STM32 ADC peripheral module and it's configuration via STM32CubeMx.
Before speaking about the aspects of configuration the project, I'd like to say some words about the challenge of this article 🙂 Let's toggle leds on the development board (STM32F4Discovery) depending on the input voltage at the special pin. Since the input power of the STM32 microcontrollers equals 3.3 V, we can measure any voltage between 0 and 3.3 V with the help of the ADC. So, let's set the following intervals:
- 0 V < U < 1 V - only one led is turned on
- 1 V < U < 2 V - two leds are turned on
- 2 V < U < 3 V - three leds are turned on
- 3 V < U - all leds are turned on (there are four leds on the development board)
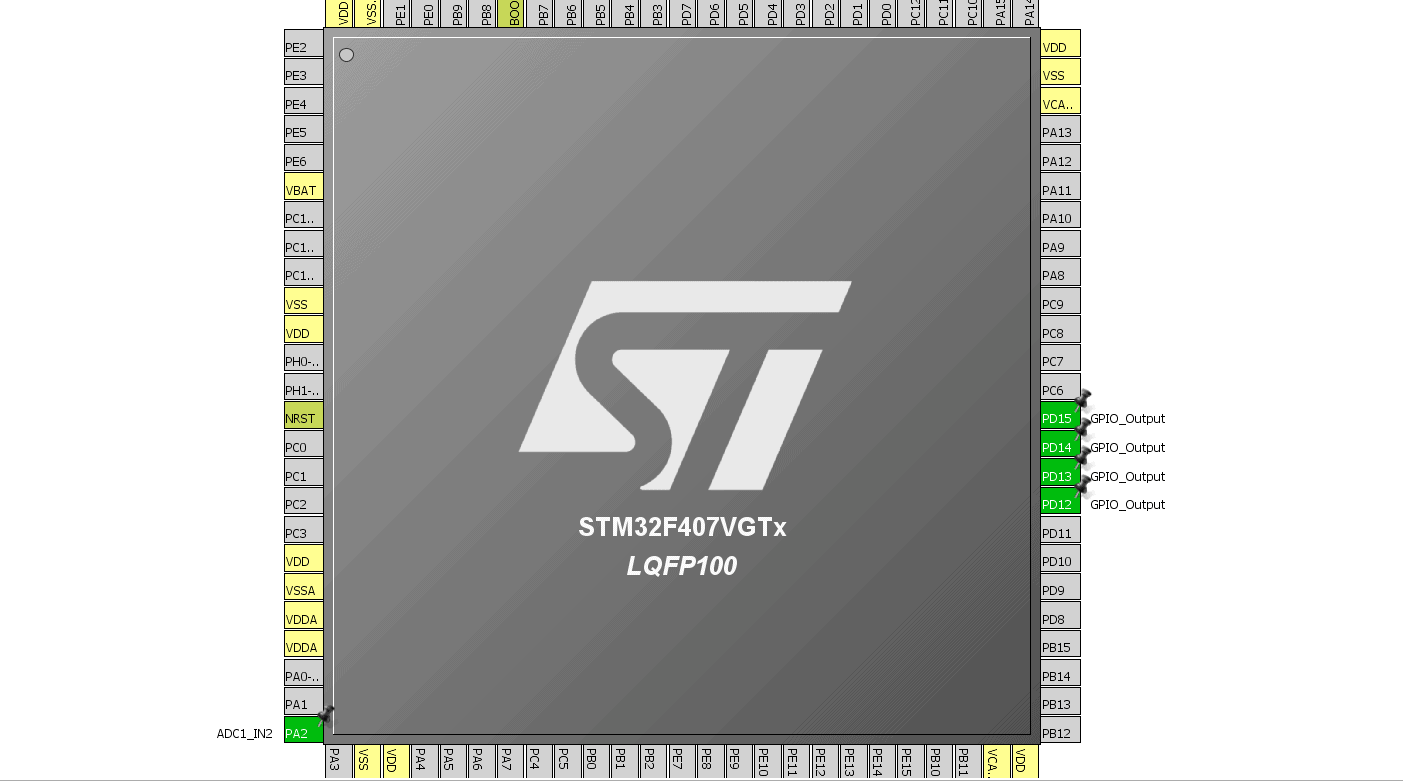
So, first of all, we should create the new project in the STM32CubeMx framework and enable five GPIOs (four of them are connected to the leds and work in "General Output" mode, and the fifth is an ADC input). For this project I decided to use the second channel of the ADC1 (PA2 pin):
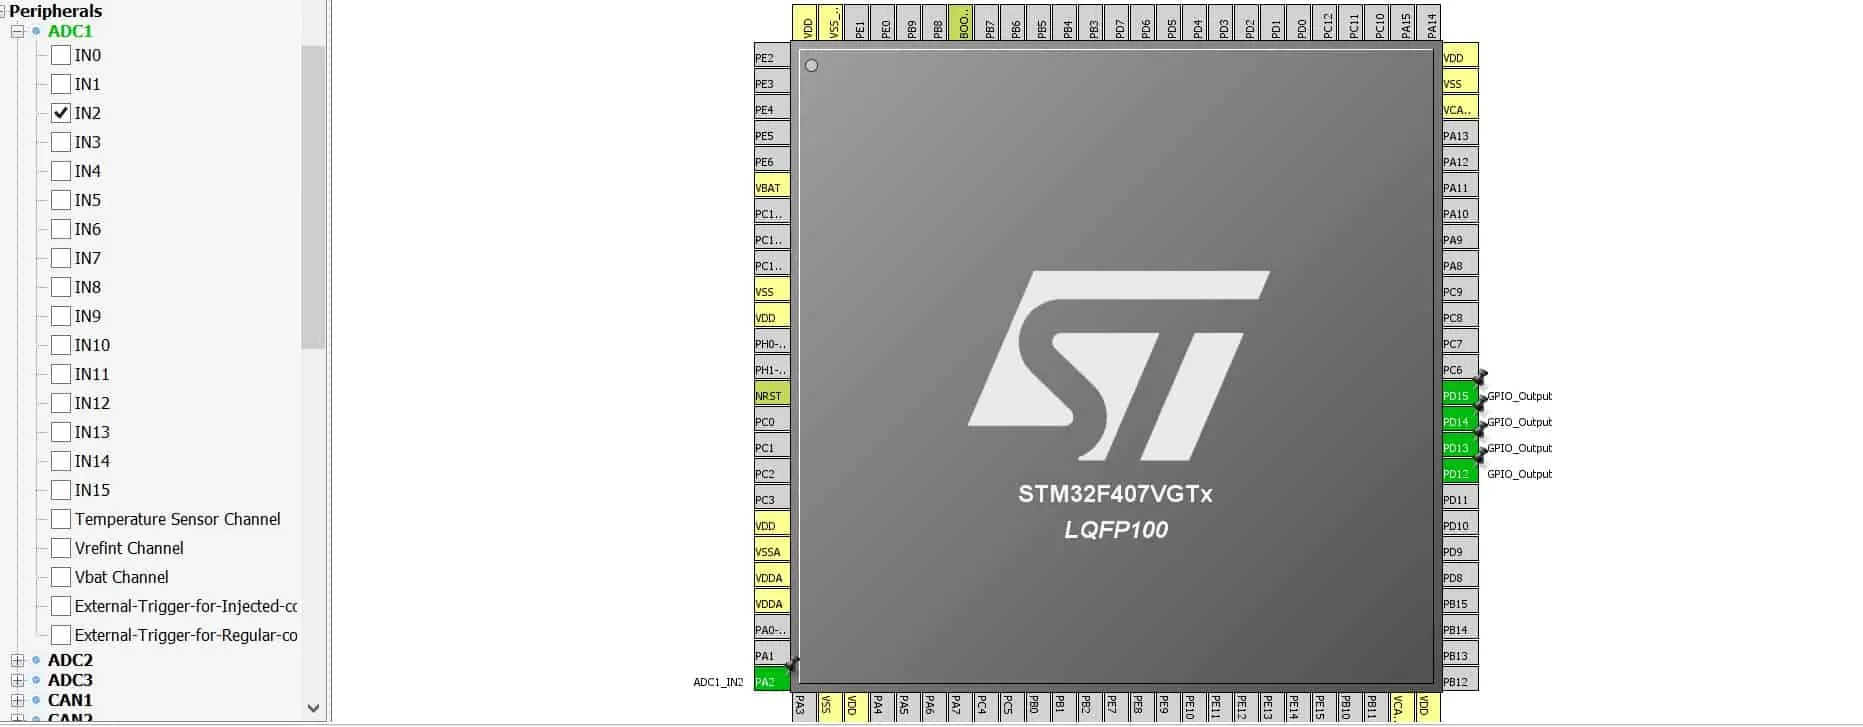
We should also check is this ADC channel is enabled at the "Peripherals" tab:
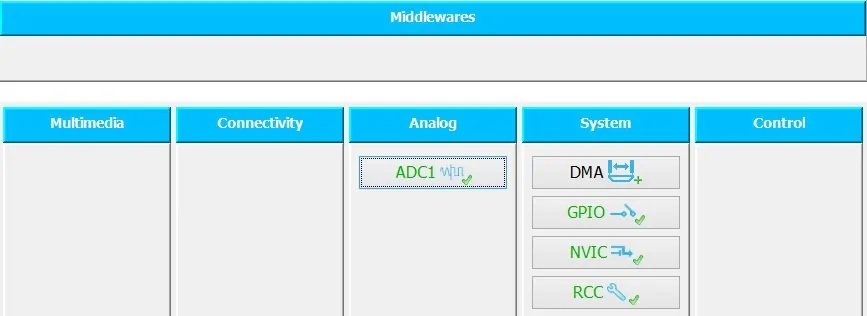
Then, if we procced to the "Configuration" tab we'll see that ADC1 extra settings have become available:
If we click on the ADC1 button, a new window, where the proper mode and other features can be set, will appear:
After setting the parameters we can start the code generation process. And next to this we should open the project in IDE and add some code! STM32CubeMx takes care about everything that connected with the configuration and initialization, but other actions, such as led toggling and ADC measurement, we should create ourselves. Firstly, declare the variable where the ADC result'll be kept:
/* USER CODE BEGIN PV */
uint32_t adcResult = 0;
/* USER CODE END PV */
Secondly, we declare the voltage threshold values:
/* USER CODE BEGIN 0 */
#define ADC_0V_VALUE                                             0
#define ADC_1V_VALUE                                             1241
#define ADC_2V_VALUE                                             2482
#define ADC_3V_VALUE                                             3723
/* USER CODE END 0 */
The ADC peripheral result in STM32 is 12 bit. Thus, the maximum value (when the input voltage equals 3.3 V) is 4095 (0b111111111111). If the voltage at the input is 1 V, we'll get the following result:
Result = 1 \cdot 4095\medspace /\medspace 3.3 = 1241
If the voltage is 2 V the result'll be:
Result = 2 \cdot 4095\medspace /\medspace 3.3 = 2482
Now all these definitions are clear 🙂
In function main() we should enable the ADC1 peripheral and then start the conversion. Since the conversion is finished we should analyze the result value and turn on the proper number of leds:
int main(void)
{
	while(1)
	{
		HAL_ADC_Start(&hadc1);

		HAL_ADC_PollForConversion(&hadc1, 100);

		adcResult = HAL_ADC_GetValue(&hadc1);

		HAL_ADC_Stop(&hadc1);

		if ((adcResult >= ADC_0V_VALUE) && (adcResult < ADC_1V_VALUE))
		{
			HAL_GPIO_WritePin(GPIOD, GPIO_PIN_12, GPIO_PIN_SET);
			HAL_GPIO_WritePin(GPIOD, GPIO_PIN_13, GPIO_PIN_RESET);
			HAL_GPIO_WritePin(GPIOD, GPIO_PIN_14, GPIO_PIN_RESET);
			HAL_GPIO_WritePin(GPIOD, GPIO_PIN_15, GPIO_PIN_RESET);
		}

		if ((adcResult >= ADC_1V_VALUE) && (adcResult < ADC_2V_VALUE))
		{
			HAL_GPIO_WritePin(GPIOD, GPIO_PIN_12, GPIO_PIN_SET);
			HAL_GPIO_WritePin(GPIOD, GPIO_PIN_13, GPIO_PIN_SET);
			HAL_GPIO_WritePin(GPIOD, GPIO_PIN_14, GPIO_PIN_RESET);
			HAL_GPIO_WritePin(GPIOD, GPIO_PIN_15, GPIO_PIN_RESET);
		}

		if ((adcResult >= ADC_2V_VALUE) && (adcResult < ADC_3V_VALUE))
		{
			HAL_GPIO_WritePin(GPIOD, GPIO_PIN_12, GPIO_PIN_SET);
			HAL_GPIO_WritePin(GPIOD, GPIO_PIN_13, GPIO_PIN_SET);
			HAL_GPIO_WritePin(GPIOD, GPIO_PIN_14, GPIO_PIN_SET);
			HAL_GPIO_WritePin(GPIOD, GPIO_PIN_15, GPIO_PIN_RESET);
		}

		if (adcResult >= ADC_3V_VALUE)
		{
			HAL_GPIO_WritePin(GPIOD, GPIO_PIN_12, GPIO_PIN_SET);
			HAL_GPIO_WritePin(GPIOD, GPIO_PIN_13, GPIO_PIN_SET);
			HAL_GPIO_WritePin(GPIOD, GPIO_PIN_14, GPIO_PIN_SET);
			HAL_GPIO_WritePin(GPIOD, GPIO_PIN_15, GPIO_PIN_SET);
		}
 }
}
After compiling the project and programming the MCU we can see that one/two/three or four leds are turned on depending on the input voltage!
To conclude this post I can say that we'll continue studying the STM32CubeMx in the future articles. Subscribe to MicroTechnics.ru and visit our site again! We'll be glad to see you! 🙂


Very helpful.!!
Thank you!
Great, working on my blue pill ok thanks
Thank you for the comment!