
Hello to all!
Today we'll try to connect SD-card to our STM32 microcontroller and to create a FAT filesystem on it. In order to test the filesystem we'll create a new file and write some data to it.
In previous posts I've used the STM32F4Discovery board, but today the development board with the STM32F10x MCU mounted on it will be tested. In spite of the fact that we'll use another board, all the phases of creating the project will be the same. Let's launch the STM32CubeMx and configure all needed units!
The SD-card is connected to the STM32 via SDIO interface, so, first of all, we should enable it. After that the SD-card checkbox will become available for checking:
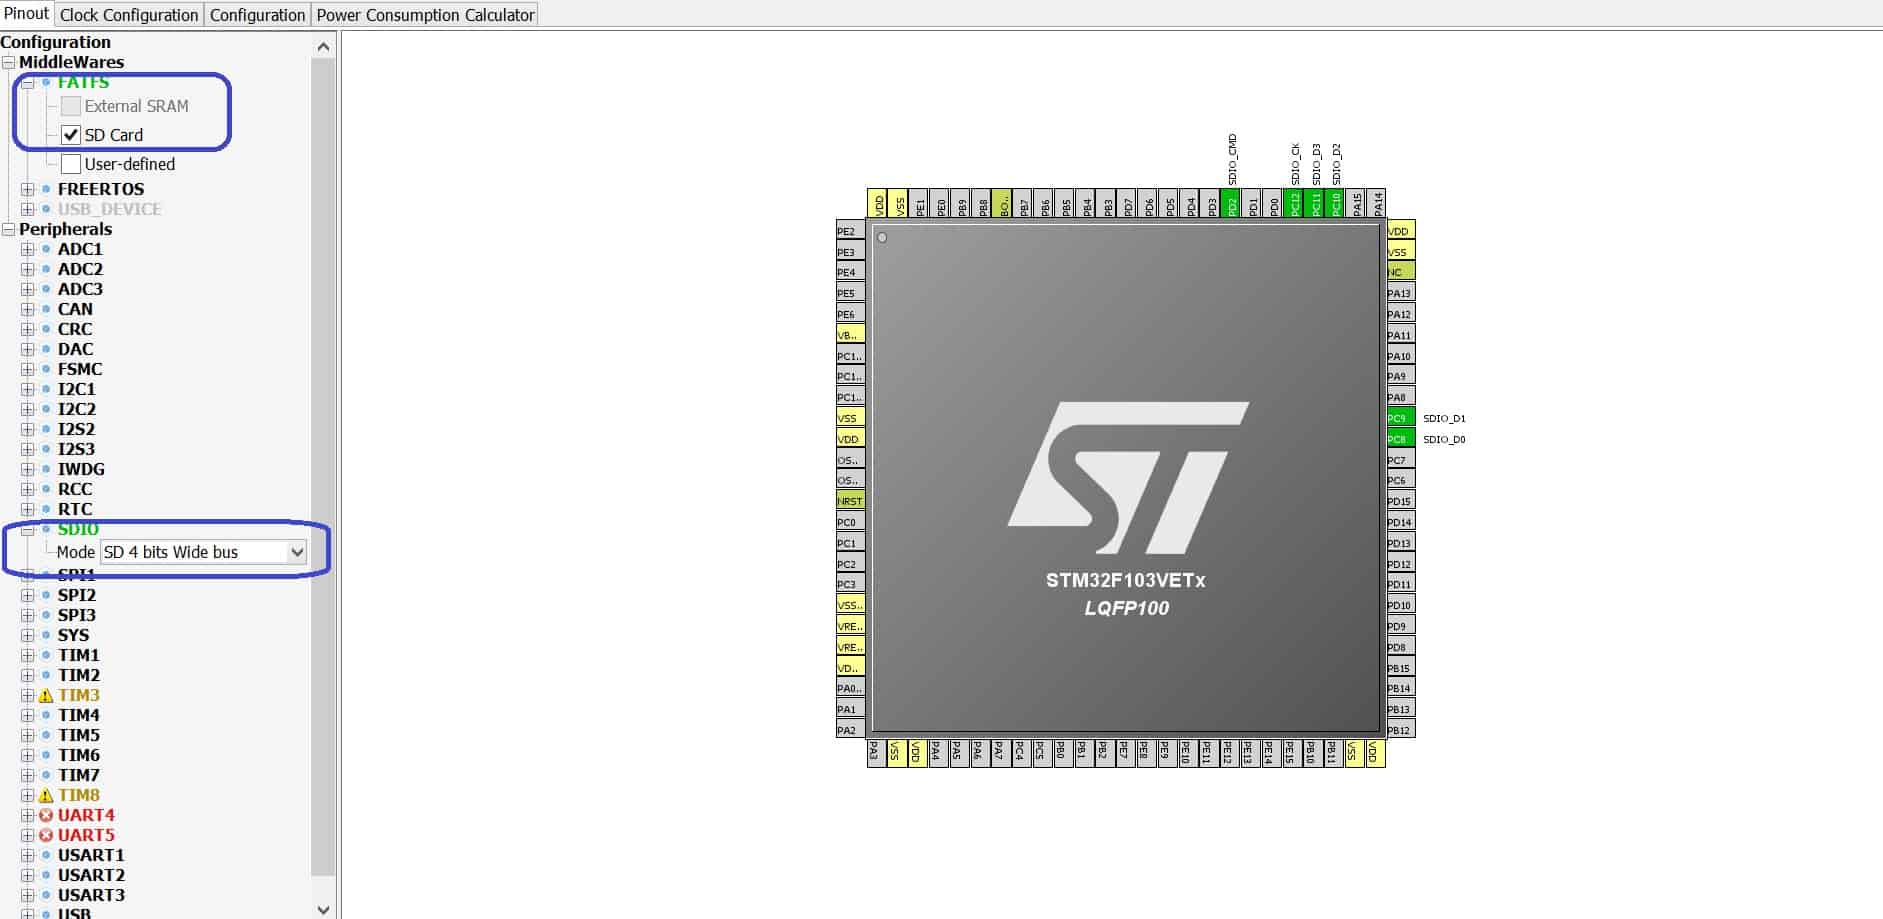
As you see STM32CubeMx marks all pins involved in our project. Please note that UART4 and UART5 units became unavailable. It is connected with the fact that the pins needed for proper UART4/UART5 work are involved in SDIO interface connections. Let's proceed to the "Configuration" tab, where we can see the new modules available for some extra configuration:

If we click on the SDIO button, a new window, where the clock divider for SDIO interface can be set, will appear:

Similarly, we can open a FatFs configuration window, but in this project we have no need of any extra settings of FAT. Thus, we can start a new project generation!
If we open the project in IDE we'll see that besides initialization functions for all used units, STM32CubeMx calls one more function named FATFS_LinkDriver(). Let's look into this function more carefully. STM32CubeMx has generated the sd_diskio.c in order to implement write and read operations. It contains the following functions:
SD_initialize,
SD_status,
SD_read,
SD_write,
SD_ioctl
Moreover SD_Driver struct, which contains the pointers to these functions is defined. And the FATFS_LinkDriver() function is exactly what binds the SD_Driver struct and the current FAT disk number. As it is the first call of this function the disk number is set to 0. If we'll decide to use one more disk, for example, NAND, we should pass number "1" into this function.
So, now it's quite clear, let's add some code in order to create a new file:
/* USER CODE BEGIN 3 */
FATFS fileSystem;
FIL testFile;
uint8_t testBuffer[16] = "SD write success";
UINT testBytes;
FRESULT res;

if(f_mount(&fileSystem, SD_Path, 1) == FR_OK)
{
	uint8_t path[13] = "testfile.txt";
	path[12] = '\0';

	res = f_open(&testFile, (char*)path, FA_WRITE | FA_CREATE_ALWAYS);
	res = f_write(&testFile, testBuffer, 16, &testBytes);
	res = f_close(&testFile);
}
/* Infinite loop */
while (1)
{
}
/* USER CODE END 3 */
This code creates a new file and writes an amount of data to it. After that the file is closed. If we'd forget to close the file the data wouldn't be written. Now we can compile the project and program the MCU.
To check the result of our work we should take the SD-card out of the development board and insert it in the cardreader. We can see the new file named testfile.txt with our data:
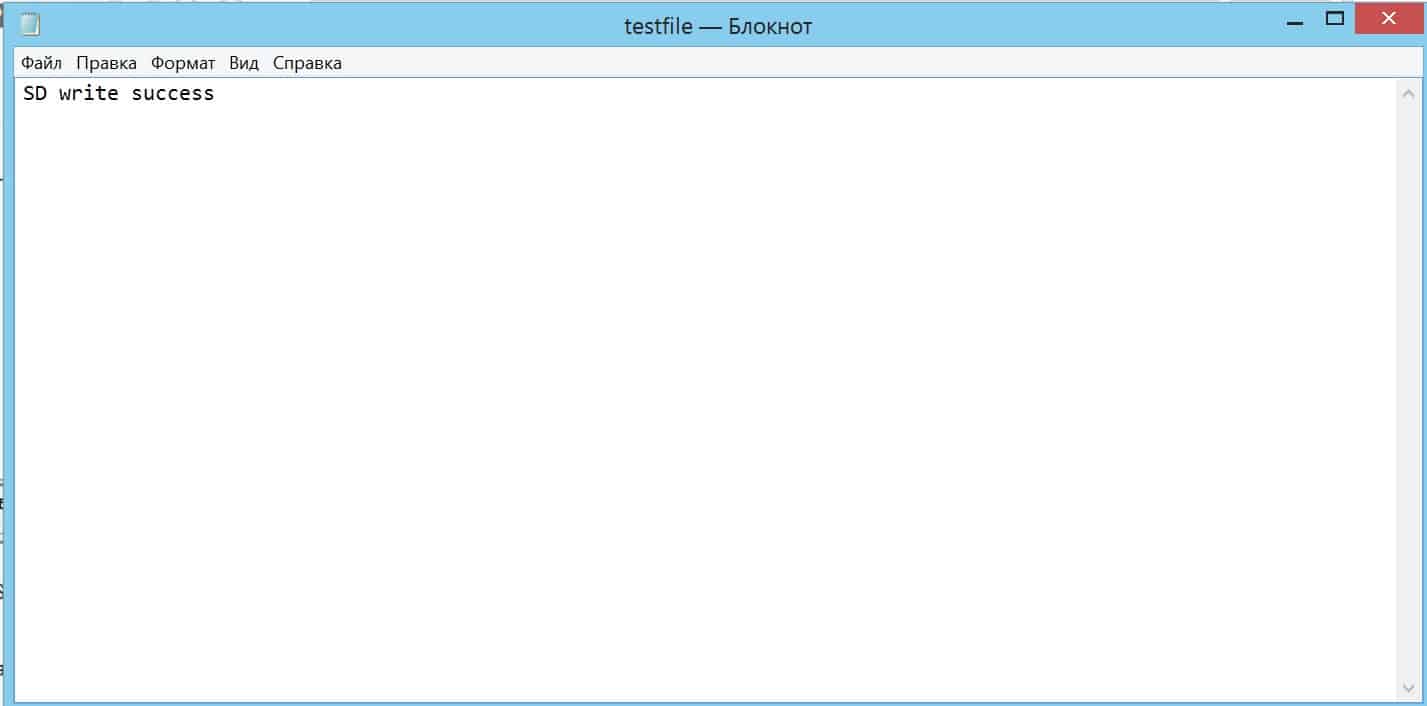
So the write operation was properly completed and our project is correct! Well, I’ll stop here, thank you for your attention! 🙂
Full project can be found here - STM32Cube_SDCardProject.

 usage with STM32CubeMx.")


Hi my friend, Could you upload the code for study?
I can't Write the SD
Hi!
I've founded this project on my HDD and added the link at the and of the post.
Thank you, I'm going to try this using Keil, I hope that it will work, but I have a question, there's a problem if I'm using a uSd adapter for read and write?
I think there'll be no problems with the uSD adapter.
For other side, Apply a SPI comunication what steps I need do for read and write?
As far as I know, STM32Cube doesn't support SD-card and SPI interface, so all of the functions should be written by the user.
Thank you, for all.
Hi!
Can you help me, how i should configure clock in STM32F4? Because in "SD 1 bit" mode everything is great but if i change to "SD 4 bit" mode it's not working.
Hi!
You can try to increase the SDIOCLK prescaler. Is the connection correct?
No :/ still the same
SD card is not working or USB connection error?
sorry for waiting, SD card is not working :/
SD 1 bit working fine but SD 4 bit no :/ I don't know why?
What version of libraries did you use? Can you try do that for F4?
I try this at STM32L4 and STM32F4, and the same problem :/
1 bit working, 4 bit not :/
I have no boards with STM32F4 and SD-card =(
I tried SDIO (4 bit) with STM32F10x with different versions of HAL and Cube and it always worked fine. Maybe there are some problems in electrical connection? Pull-up resistors? Does the card work properly without USB? Just writing/reading some blocks of data?
Electrical connection must be fine, because 1-bit mode works fine 🙂 I use F4Discovery with DM-STF4BB - so electrical must be ok 🙂
So more i check it with standard module microsd with pull up resistor and the same problem :/
Can i send you a code and maybe a film with everything?
Ok. My email - Aveal.MicroTechnics@gmail.com.
I am testing microsd with stm32f405rgt6. The weird thing is that the first run after power up fails when it opens the file to write. Then I reset the chip by manually pull NRST to ground. it works, open file, write and read file. I pull nrst again to ground. file reading/writing has no problem.
The only problem is the first run.
Therefore the hardware(like connection) should be fine. Software should be fine too. What is the problem in the first run?
You can try to add a delay after powering up and before working with SD card.
I am testing it with my stm32f4-board and it does not work
both 1-bit and 4-bit don't work
Does your card work without FatFs?
how i can doing the test automatically
The STMH7 series processors has a completely different interface. Instead of DMA, it uses MDMA. I have yet to see an example of SDMCC & FATFS that is STM32CubeMX compatible. Anyone have one?